Customer Portal
The customer portal app enhances the standard Shopify online account by adding features that allow customers to manage their club subscriptions, loyalty tiers, allocations, and exclusive products. To enable the customer portal app, you must configure it and activate it in your theme.
Creating a customer account
Accessing the customer portal
To access the portal, customers can click the user icon in the top right of your website. It’s important that they use the same email address they provided when signing up for a club or making a purchase, as Shopify links subscriptions to the email used at the time of creation.
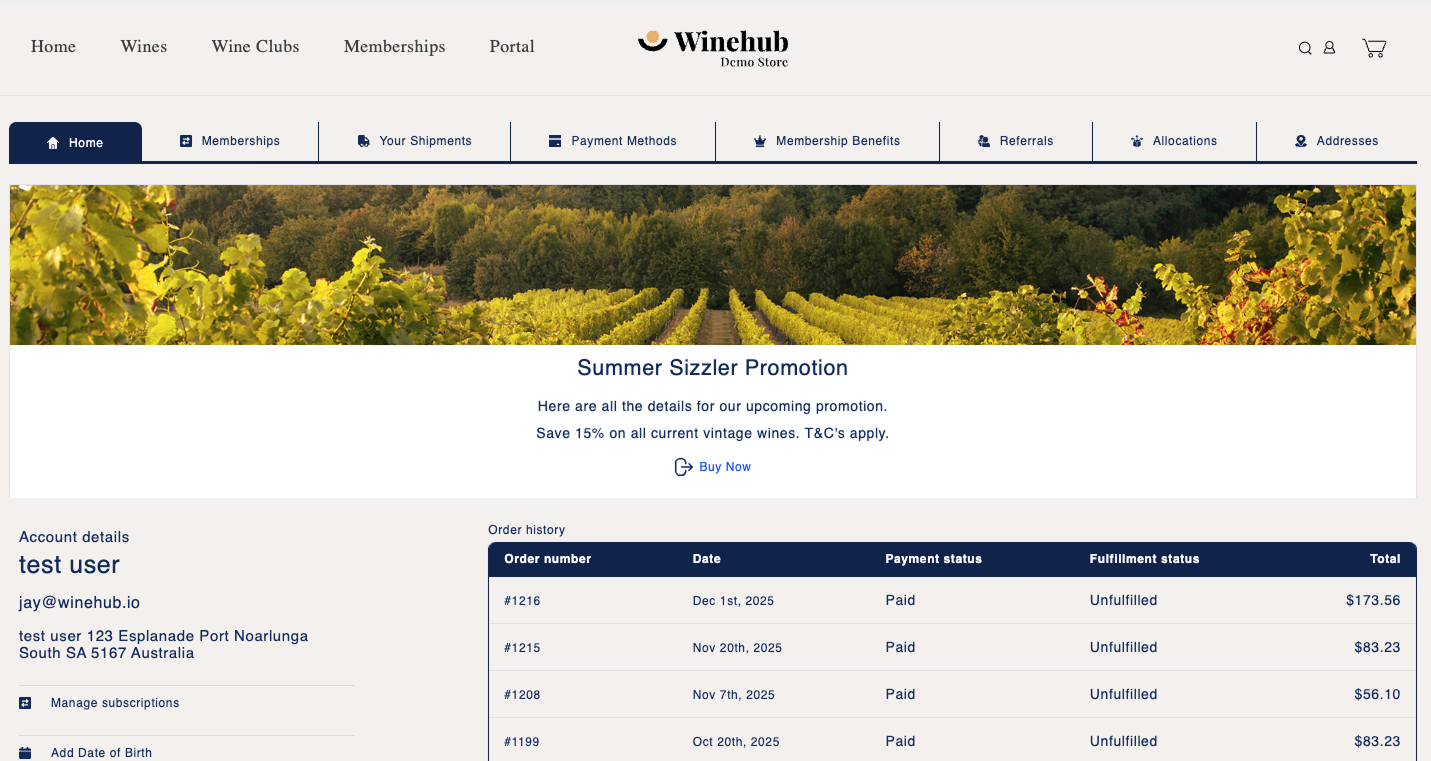
What the Customer Sees

- Home: Displays a summary of the customer’s historic orders and any current discount codes.
- Subscriptions: Lists active club subscriptions, allowing the customer to view, edit, or cancel their membership (if cancelation is enabled) and update their subscription address.
- Upcoming Shipments: Shows upcoming club orders, giving customers the option to skip selected shipments or modify order add-ons (if this feature is enabled).
- Payment Methods: Allows customers to update their default payment method.
- Exclusive Products: Displays any exclusive products made available through a membership tier or added directly for the customer.
- Membership Benefits: Shows the customer’s progress in any active membership loyalty tiers.
- Referrals: If the referral program is active, this section lists any rewards earned by the customer.
- Allocations: Displays product allocations that the customer is eligible for.
- Addresses: Allows the customer to update their default address and club shipment address.
Dynamic Customer Blocks
Dynamic Customer Blocks allow you to display custom messages, promotions, or announcements directly inside the Winehub Customer Portal. These blocks can be scheduled, styled, and positioned to ensure the right message appears at the right time for your customers.
This feature is ideal for:
Promoting limited-time offers
Sharing important account or delivery updates
Highlighting new releases or upcoming events
Reinforcing loyalty or wine club benefits
Enable Dynamic Custom Blocks
Before creating any blocks, the feature must be enabled.
Navigate to Settings → Customer Portal Settings
Scroll to the Dynamic Custom Block section
Toggle Allow Custom Dynamic Blocks on
This toggle enables any blocks you create to appear in the Customer Portal.
Create a new Dynamic Custom Block
Once enabled, switch to the Create Block tab to build your first custom block.
The block creation process is broken into four clear steps.
Step 1: Placement & visibility
Use this section to control where and when the block appears.
Overall Position
Choose where the block will sit on the page (for example, top or bottom of the portal view).Visible On
Select which Customer Portal page should display the block.
These settings ensure your message appears in the most relevant context for customers.
Step 2: Upload block image
You can optionally add a banner-style image to your block.
Image requirements:
PNG or JPG format
Recommended size: 1920 × 400 pixels
Upload a new image or select one from your existing image library.
Step 3: Content & styling
This section controls the text content and layout of your block.
Style Heading
Enter a heading for the block.Heading Position
Choose where the heading appears (ie. left, right or centred)Style Body
Add supporting text or messaging.Body Position
Control where the body content is displayed.
Step 4: Customised links & schedule
This step allows you to add a call-to-action and control timing.
Link Label
The clickable text shown to customers (e.g. “Shop now”, “Learn more”).Embedded Link
The URL customers will be taken to when they click the link.Start Date
The date the block will begin displaying.End Date
The date the block will stop displaying (leave blank for a permanent message).
Blocks will automatically appear and disappear based on these dates - no manual intervention required.
Step 5: Preview and save
At the bottom of the page you’ll find three actions:
Show Preview – See how the block will appear to customers
Reset Fields – Clear all fields and start again
Save Custom Block – Save and activate the block
Once saved, the block will display in the Customer Portal according to your visibility and schedule settings.
Best practice tips
Use clear, concise messaging - customers typically scan the portal quickly.
Schedule blocks to align with promotions, releases, or delivery cycles.
Keep images lightweight and on-brand to maintain fast portal load times.
Use links to direct customers to high-intent pages such as allocations, releases, or special offers.
Troubleshooting
Block not appearing?
Confirm Allow Customer Dynamic Blocks is enabled.
Check the Start Date and End Date are correct.
Ensure the block is set to appear on the correct page under Visible On.
Image not uploading?
Confirm the file is a JPG or PNG.
Check the image dimensions are close to 1920 × 400 pixels.
Related Articles
Customer Portal - Amount No Decimals
Issue Instead of showing sales totals, the customer portal is displaying {{ amount_no_decimals }}. Common Cause This issue is caused by a theme clash with Shopify's coding language, liquid. How to Resolve The solution to this liquid error is to edit ...Customer Profile
The Customer Profile in Winehub provides a comprehensive, tabbed view of each customer, including contact details, subscription activity, loyalty status, order history, benefits, payment methods, notes, and automated communications. Some information ...Customer Contracts
Contracts are where you will find all wine club subscriptions. Use the filters on this page to report on contracts by name, club, frequency, status or created date. View Contract When you view a subscription contract you can view the following ...Customer Segments
Customer segments in Winehub let you group your customers based on behaviour, preferences, and purchase history - enabling you to deliver highly targeted marketing that resonates. Whether you're promoting a Merlot special or launching an exclusive ...Updating Customer Contact Details
Shopify serves as the master record for most customer details and these details are synced directly into Winehub. This means that most updates to customer contact details should be made within Shopify, with the exception of Subscription Addresses. ...